Load Ticket Entry & Navigation


|
Load Ticket Entry & Navigation |
|
|
For LoadCalc Professional!, the Add/Edit Load Tickets Screen is the heart of the system. To access this screen, you can either click 'Tickets' on the Quick Access Toolbar or by clicking 'Load Tickets', 'Load Tickets' from the main drop-down menu.
If you are using the Unregistered Demo version of LoadCalc Professional! a pop-up message will remind you that the Unregistered Demo version will only allow you to enter up to 25 load tickets.
The window below will open to provide access to the Add/Edit Load Tickets screen.

There is one feature on this screen that you should familiarize yourself with first because it will help provide you with important and very useful information. In the top right-hand corner of this screen you will find a screen element entitled 'Calculate Sub-Totals By:' where you can control how the sub-totals are calculated as you enter load tickets. You can click on four options: 1) Tract Id, 2) Logger Id, 3) Hauler Id, 4) Mill Id and 5) Product Id. The white box below these choices is the area where the sub-totals will be displayed and the list of sub-totals will change based upon the selection you make above the box. It is fairly self-explanatory, but clicking on the Logger ID radio button will provide sub-totals by Logger Id. Clicking on Tract Id, will provide sub-totals by Tract Id and so on. You can change the sub-total method at any time and the sub-total box will automatically refresh to reflect the new sub-totals. Immediately below the sub-total box, you will see a daily total of the Delivered values for the date you are currently entering. This total will be the same no matter how you choose to display the sub-totals, but it will change based upon the date and the tickets you enter.
You can sort the grid at the bottom of the screen by clicking on the header name of any column to sort by that column. The grey triangle
It is important to note that LoadCalc Professional! is designed to allow you to enter load tickets by date. You can enter tickets in any order you like, but the program is optimized for you to pre-sort your load tickets by date and then enter them into the system. You can change the date at any time by either entering a new date into the date field, or you can click on the small button at the end of the date field with the calendar icon
Additionally, you can change the date one day at a time by clicking one of the arrow keys
Once you've selected a date, you can begin entering load tickets. You must complete all of the fields before the program will activate the 'Save' button so you can save the ticket you have entered. Each of the fields are described below:
Note the last column on the grid with the header 'Pd.' A check mark in this column indicates that the ticket has been marked as having been paid on the Clear Paid Tickets screen.
Saving Load Tickets
Once all of the fields have been entered, the 'Save' button should activate and you can click save to store the load ticket in the grid below. The system will check all of the fields once again to verify the accuracy of the data entry and prompt you if there are any errors that need to be corrected prior to saving. Once the save has been completed, the new load ticket will be displayed in the grid at the bottom of the screen.
If you are using the Unregistered Demo version of LoadCalc Professional!, each time you save a load ticket you will be reminded that the program will only store up to 25 tickets and how many more tickets you can save. After you've entered 25 tickets, the program will save no more load tickets.
Once the program is registered, this nag screen will go away.
Settlement Rates
We need to take a moment to discuss Settlement Rates. While you can certainly enter all of the possible combinations of Settlement Rates manually when you enter the Tract information on the Tract List screen, you may optionally set the Settlement Rates while entering Load Tickets. Settlement Rates are organized within LoadCalc Professional! based upon the unique combinations of Tract Id, Logger Id, Hauler Id, Mill Id, and Product Id entered on Load Tickets.
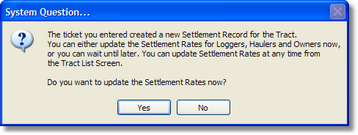
After you complete the entry of a Load Ticket, the program automatically checks to see if the particular combination you entered matches the Load Ticket already exists in the Tract Settlement Rates table. If the combination cannot be found, a new record will be created in the Settlement Rate table and you will be asked if you want to update the Settlement Rates at this time:
If you click the 'Yes' button, you will be presented with a special version of the Edit Settlement Rates screen that will only allow you to edit the rates, but not change any of the qualifier Id's. After you've completed the changes you want to make to the rates, click the 'Save' or 'Exit' button to return to the Add/Edit Load Tickets screen.
This option to enter Settlement Rates during the entering of Load Tickets is only available when new, unique combinations are detected. If a Settlement Rate record has previously been created, the program will not prompt you to update the rates. To change Settlement Rates at any time after the Settlement Rate record has been created, you must go to the Tract Settlement Rates screen.
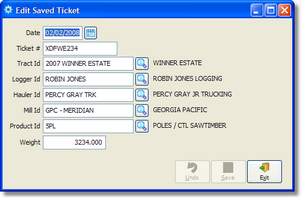
Editing Load Tickets
If you need to Edit a Load Ticket, locate the ticket in the grid at the bottom of the screen and either double-click on any column of the load ticket, or click on the 'Edit' button. This will open the Edit Load Tickets screen to provide you with a way to edit any part of the saved load ticket.
Deleting Load Tickets
If you need to Delete a Load Ticket, click on the ticket you want to delete in the grid at the bottom of the screen and then click the 'Delete' button. You will be prompted to confirm whether you really want to delete the selected ticket. If you confirm the deletion, you will be asked one more time if you are absolutely sure that you want to permanently delete this ticket. If you confirm the deletion a second time, the ticket will be removed from the grid and deleted from the Load Ticket table. Tract Production Totals will be reduced to reflect the amount of the deleted delivered weight.
Print Load Tickets
To print a quick list of the load tickets entered for a single date, click the 'Print' button. You will be asked to preview, print or export the report. The report will be sorted the same as the grid at the bottom of the screen.
|