Tracts


|
Tracts |
|
|
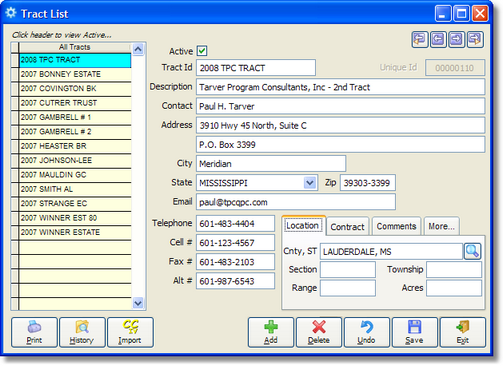
You can access the Tract List screen either by clicking on the 'Tracts' button on the Quick Access Toolbar, or by clicking 'Lists', 'Tracts' from the main menu. The screen above will open and give the user the ability to Add, Edit or Delete tracts.
Some navigational tips to remember:
Probably the most important field on this screen is the Tract Id. The Tract Id is a twenty (20) character unique identifier for each tract entered into the system. All of the sub tables reference this identifier to keep all of the records related together. All load tickets entered into the system must be assigned to a Tract Id in order to produce accurate reports. Since you will probably reference this Id often, take a few minutes to think of a naming scheme that works best in your company. It is possible to simply use numbers, but numbers are more difficult to remember. What may work better is some reference to the Description.
For example, if the tract is owned by someone named Bubba Johnson, you may want to name the tract JOHNSON01 to indicate this is the first tract from anyone named Johnson. Another method of naming might be to use a few characters of the last name and a few of the first name. In our previous example, Bubba Johnson create a Tract Id such as JOHNBUB. One recommendation might be to always end each Tract ID with a 2-digit number just in case you have tracts with similar Tract Ids. The best advice is to pick a method of naming and stick with it. It will save you a lot of time in the long run.
The Description field provides up to 50 alphanumeric characters to help describe the tract in more detail
The Contact field is usually the name of the owner of the tract.
The Address, City, State, and Zip fields can either be the location of the Tract or the contact information of the owner of the tract. The State field is unique in the sense that you cannot type directly in the field. Any key you press will automatically take you to the closest match within the Postal Code List. As you type the name of the state, the system will do its best to find the matching state name to save you some typing.
Email, Telephone, Cell #, Fax # and Alt # fields are self-explanatory.
In the bottom right-hand corner of this screen is a series of tabs with various extended information you can store on the tract.
Location Tab On the Location Tab, you can enter a County or select a County that you've already entered by clicking on the small magnifying glass at the end of the County field. If you enter a county that hasn't already been entered, you'll be prompted to add the new county to the County List table. Enter the Section, Township, Range and number of Acres of the Tract.
Contract Tab Clicking on the Contract tab will give you access to the Contract Date, Cut Start Date, Cut End Date fields. Clicking on the small calendar at the end of each field will bring up a calendar so you can pick the dates directly rather than type them.
Comments Tab Clicking the Comments Tab will display a small box where you can type up to 250 alphanumeric characters as notes. This can be any information that you want to store on the tract that can't be stored in any of the provided fields.
More... Tab The More... Tab displays buttons which provide access to various sub-tables that store in-depth information and totals related to the tract. Some of this information is updated automatically as you enter load tickets and some must be entered directly by you. The More...Tab provides access to the following screens:
Click on any of the previous items to see details on each sub-screen.
You can click the 'Print' button to print or export a quick list of the tracts stored in the system.
You can click the 'History' button to view all load tickets entered for the highlighted tract.
Click 'CCIV Import' to import tract details from CruiseCalc IV for Windows.
|